Search This Blog

Friday, August 17, 2012

Pin Type Processors, and You: A Quick Guide to Replacing or Removing the Older PIN Style Processors from PowerEdge Servers, 8th Gen and Older

By Mike Kidd – Velocity Tech Solutions
One of the things I commonly find as a usual suspect in troubleshooting after replacing a system board is improperly seated or removed processors. Fret not, because this happens to the best of technicians and even the novice. In particular, when removing the processor from an 8th gen or older Dell server, the processor comes off with the heatsink. Not that this is always a problem, but it does greatly increase the chance of bending one of the thousands of tiny, tiny pins that make the unit work properly.
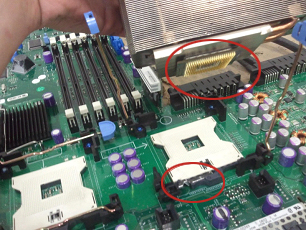
Notice the silver lever on the white processor socket is still down and the CPU itself is still attached to the heatsink. Some people assume that this is normal practice and attempt to remove the CPU from the heatsink and simply set it back on top of the processor socket without lifting that silver bar.

 Here is what the bar does:
The bar moves the socket forward, and what happens when the bar is up, it lets the CPU pins enter the socket straight up and down. Once the bar is moved back down, the socket shifts and locks the pins in place, creating the solid connection needed to run.

 So, you may be asking; how do I properly remove the heatsink and processor?

 If you look at my fantastic MS Paint skills, you will grab onto the heatsink and give it a twist. This will break the thermal compound free that attaches the processor to the heatsink. At first, it may seem kind of stiff and as if it is going to break. Don’t worry. As long as you twist instead of lift, the processor will stay safely in its socket until you raise the metal lever.


Hopefully this article will help you correctly remove your CPU and assist in motherboard replacement.
Feel free to call us at 888-784-2088 or visit our website anytime at www.velocitytechsolutions.com


Tuesday, April 17, 2012

How to Replace SAS 5 Controller on a PowerEdge Server

Today, we are going to do a quick write-up with a video on replacing a failed SAS 5 raid controller. This procedure is pretty much the same across the entire PowerEdge line of servers.
Firstly, shut down your server and open the case. Locate your SAS 5 raid controller and you will see something like Fig. 1.
Fig. 1
Unscrew the card from your case, and squeeze the blue tabs on the side of the SAS cable, lifting it straight off the card. Next, lift the card out of the server and replace it with your new one.
Installation is much more in-depth in the video demonstration, but basically is the reverse of the removal.
Now, when you turn your server back on, you will get a message stating your virtual disk is inactive/optimal. (Fig. 2)
We are going to go into the raid configuration utility by pressing “CTRL C” when prompted.
Fig. 2
Once inside, press “enter” and arrow over to the “raid properties” menu (Fig. 3) and press enter. We are going to arrow down to “manage array” (Fig. 4) and press enter. Now arrow down to “activate array” and press enter.
Fig 3
This part of the procedure can be a bit scary because it is taking the existing mirror and bringing it down to a raid 0 and re-syncing it back to a mirror or raid 1. As soon as you activate the array again, you will see it re-syncing if you go back into “manage array” (Fig. 4) in the configuration utility. I have seen windows while booting come up with “NTLDR NOT FOUND” until the sync is 100% complete so do not panic.
Fig 4
Don’t forget to check out the video to this article and our video tutorials at our YouTube channel: velocity783. Have a How-To request?  Request your own and we will get right to work on it for you!

Wednesday, March 28, 2012

How to clear an Idrac6


By Anne Tarantino Via Mike Kidd
I had a call from a customer unable to clear his Idrac6. Since in his case he had the BMC, Idrac6 Express and Idrac6 Enterprise, I had to get the big guns, the Kidd, Mike Kidd!
Mike took me through the 3 idracs on a Dell Poweredge R710 and for being not nearly as technical as he is , oddly it made sense to me.  The weird part to me was the clearing of Idrac6 which seemed a bit unconventional.  So often we joke about calling tech support and so often you hear “reboot” or “Unplug it” I will never ever again laugh at those commands from the tech on the other end of the line if I hadn’t seen it with my own eyes.
So if any of you need to clear you Idrac6, be it Idrac6 Express, or Idrac6 Enterprise on your  Dell Power edge R or T series servers, here’s how it’s done:
If your server is coming up saying your Idrac6 can’t be initialized or cannot be found or overall acting up, on your  Dell Power edge R or T series Dell server, then here’s a quick couple of things to  try to get it back online:
·         unplug server from wall – completely power down system and remove power from the wall  for about a minute or 2.
·         Reapply power to system, but do not turn on for a minute or 2
·         Try applying power to see if issue resolved.

If this does not resolve the issue
·         completely power down the system, unplug from the wall and remove idrac6 express and/or enterprise Idrac6 if installed.
·         Turn on server, and reset the BMC firmware through the control E menu in post
·         Rest BMC to defaults you will know it’s resetting to default  when you hear the fans spin up
·         Shut down server unplug from wall again, install the idrac6 express and/or enterprise Idrac 6.
·         Plug in server, but don’t turn on for a minute or 2.
Turn back on and it should work properly once again.

Each Dell Power edge T and R series servers come with the BMC idrac on it. There are options for the Idrac6 express and Idrac6 enterprise. Each idrac6 option has various features.


Thanks for reading and we hope this helps all that need it!


Monday, January 30, 2012

EMC VNX/VNXe Storage Array. So easy, even a salesperson can use it.

I know enough about storage, servers and networking equipment to be dangerous. I have to know something about it, I sell the stuff. To put me, a salesperson in front of one of these machines to actually do something with it AND set up RAID configurations is pretty scary.
Well, after learning about these fabulous little machines, I haven’t quite crowned myself Queen Geek, but I feel like I can actually make it go…..and actually make it work. It’s no wonder EMC has 40% of the storage market share.
With the popularity of virtualization and the cloud, storage is becoming even more vital for all size of business, but EMC developed the VNX/VNXe  especially for the SMB market.
Designed for IT generalists, the VNXe series enables complete storage consolidation with advanced file and block functionality as well as a simple, application-centric approach to managing shared storage. The VNXe series provides significant advancements in simplicity, efficiency, and affordability, including:
•          Unisphere application-driven wizards, which make VNXe series easy to install, provision, and manage. An online eco-system simplifies maintenance.
•          A new architecture with integrated file (CIFS, NFS) and block (iSCSI) functionality, and a 6 Gb/s SAS back-end infrastructure.
•          A small footprint (starts at 2U), with a real-world configuration under $10,000.
•          A departmental or ROBO platform that can replicate to VNX series in the data center.
•          Data efficiency services, such as file deduplication/compression and thin provisioning.
  •       Intel 5500 series processors for processing power
  •       The VNX/VNXe can run without a host server and is compatible with all brands of   
      Server’s and switches           
These are just a few of the benefits to using the VNX/VNXe. For more information you can visit me at www.velocitytechsolutions.com .