Search This Blog

Friday, August 17, 2012

Pin Type Processors, and You: A Quick Guide to Replacing or Removing the Older PIN Style Processors from PowerEdge Servers, 8th Gen and Older

By Mike Kidd – Velocity Tech Solutions
One of the things I commonly find as a usual suspect in troubleshooting after replacing a system board is improperly seated or removed processors. Fret not, because this happens to the best of technicians and even the novice. In particular, when removing the processor from an 8th gen or older Dell server, the processor comes off with the heatsink. Not that this is always a problem, but it does greatly increase the chance of bending one of the thousands of tiny, tiny pins that make the unit work properly.
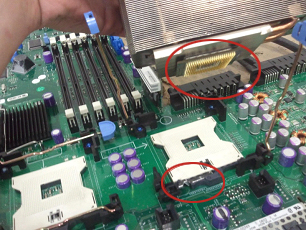
Notice the silver lever on the white processor socket is still down and the CPU itself is still attached to the heatsink. Some people assume that this is normal practice and attempt to remove the CPU from the heatsink and simply set it back on top of the processor socket without lifting that silver bar.

 Here is what the bar does:
The bar moves the socket forward, and what happens when the bar is up, it lets the CPU pins enter the socket straight up and down. Once the bar is moved back down, the socket shifts and locks the pins in place, creating the solid connection needed to run.

 So, you may be asking; how do I properly remove the heatsink and processor?

 If you look at my fantastic MS Paint skills, you will grab onto the heatsink and give it a twist. This will break the thermal compound free that attaches the processor to the heatsink. At first, it may seem kind of stiff and as if it is going to break. Don’t worry. As long as you twist instead of lift, the processor will stay safely in its socket until you raise the metal lever.


Hopefully this article will help you correctly remove your CPU and assist in motherboard replacement.
Feel free to call us at 888-784-2088 or visit our website anytime at www.velocitytechsolutions.com


Tuesday, April 17, 2012

How to Replace SAS 5 Controller on a PowerEdge Server

Today, we are going to do a quick write-up with a video on replacing a failed SAS 5 raid controller. This procedure is pretty much the same across the entire PowerEdge line of servers.
Firstly, shut down your server and open the case. Locate your SAS 5 raid controller and you will see something like Fig. 1.
Fig. 1
Unscrew the card from your case, and squeeze the blue tabs on the side of the SAS cable, lifting it straight off the card. Next, lift the card out of the server and replace it with your new one.
Installation is much more in-depth in the video demonstration, but basically is the reverse of the removal.
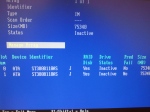
Now, when you turn your server back on, you will get a message stating your virtual disk is inactive/optimal. (Fig. 2)
We are going to go into the raid configuration utility by pressing “CTRL C” when prompted.
Fig. 2
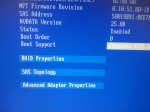
Once inside, press “enter” and arrow over to the “raid properties” menu (Fig. 3) and press enter. We are going to arrow down to “manage array” (Fig. 4) and press enter. Now arrow down to “activate array” and press enter.
Fig 3
This part of the procedure can be a bit scary because it is taking the existing mirror and bringing it down to a raid 0 and re-syncing it back to a mirror or raid 1. As soon as you activate the array again, you will see it re-syncing if you go back into “manage array” (Fig. 4) in the configuration utility. I have seen windows while booting come up with “NTLDR NOT FOUND” until the sync is 100% complete so do not panic.
Fig 4
Don’t forget to check out the video to this article and our video tutorials at our YouTube channel: velocity783. Have a How-To request?  Request your own and we will get right to work on it for you!

Wednesday, March 28, 2012

How to clear an Idrac6


By Anne Tarantino Via Mike Kidd
I had a call from a customer unable to clear his Idrac6. Since in his case he had the BMC, Idrac6 Express and Idrac6 Enterprise, I had to get the big guns, the Kidd, Mike Kidd!
Mike took me through the 3 idracs on a Dell Poweredge R710 and for being not nearly as technical as he is , oddly it made sense to me.  The weird part to me was the clearing of Idrac6 which seemed a bit unconventional.  So often we joke about calling tech support and so often you hear “reboot” or “Unplug it” I will never ever again laugh at those commands from the tech on the other end of the line if I hadn’t seen it with my own eyes.
So if any of you need to clear you Idrac6, be it Idrac6 Express, or Idrac6 Enterprise on your  Dell Power edge R or T series servers, here’s how it’s done:
If your server is coming up saying your Idrac6 can’t be initialized or cannot be found or overall acting up, on your  Dell Power edge R or T series Dell server, then here’s a quick couple of things to  try to get it back online:
·         unplug server from wall – completely power down system and remove power from the wall  for about a minute or 2.
·         Reapply power to system, but do not turn on for a minute or 2
·         Try applying power to see if issue resolved.

If this does not resolve the issue
·         completely power down the system, unplug from the wall and remove idrac6 express and/or enterprise Idrac6 if installed.
·         Turn on server, and reset the BMC firmware through the control E menu in post
·         Rest BMC to defaults you will know it’s resetting to default  when you hear the fans spin up
·         Shut down server unplug from wall again, install the idrac6 express and/or enterprise Idrac 6.
·         Plug in server, but don’t turn on for a minute or 2.
Turn back on and it should work properly once again.

Each Dell Power edge T and R series servers come with the BMC idrac on it. There are options for the Idrac6 express and Idrac6 enterprise. Each idrac6 option has various features.


Thanks for reading and we hope this helps all that need it!


Monday, January 30, 2012

EMC VNX/VNXe Storage Array. So easy, even a salesperson can use it.

I know enough about storage, servers and networking equipment to be dangerous. I have to know something about it, I sell the stuff. To put me, a salesperson in front of one of these machines to actually do something with it AND set up RAID configurations is pretty scary.
Well, after learning about these fabulous little machines, I haven’t quite crowned myself Queen Geek, but I feel like I can actually make it go…..and actually make it work. It’s no wonder EMC has 40% of the storage market share.
With the popularity of virtualization and the cloud, storage is becoming even more vital for all size of business, but EMC developed the VNX/VNXe  especially for the SMB market.
Designed for IT generalists, the VNXe series enables complete storage consolidation with advanced file and block functionality as well as a simple, application-centric approach to managing shared storage. The VNXe series provides significant advancements in simplicity, efficiency, and affordability, including:
•          Unisphere application-driven wizards, which make VNXe series easy to install, provision, and manage. An online eco-system simplifies maintenance.
•          A new architecture with integrated file (CIFS, NFS) and block (iSCSI) functionality, and a 6 Gb/s SAS back-end infrastructure.
•          A small footprint (starts at 2U), with a real-world configuration under $10,000.
•          A departmental or ROBO platform that can replicate to VNX series in the data center.
•          Data efficiency services, such as file deduplication/compression and thin provisioning.
  •       Intel 5500 series processors for processing power
  •       The VNX/VNXe can run without a host server and is compatible with all brands of   
      Server’s and switches           
These are just a few of the benefits to using the VNX/VNXe. For more information you can visit me at www.velocitytechsolutions.com .

Tuesday, August 9, 2011

Replacing Raid Kit in Dell PowerEdge 2850

By Mike Kidd – Velocity Tech Solutions
We have all been there, “memory/battery error” on the PowerEdge 2800-2850-1850 server. And most of the time this can be fixed rather easily with minimal downtime. So today, I will be doing a walk-through on replacing the raid kit on the 28xx series server. Now there are a few cases where it can end up being the riser card causing the issue, but replacing the raid kit seems to fix it more often than not.
Fig 1
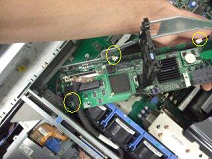
First things first, Power down your server and remove the cover. You will now be looking at the picture shown in Fig 1. The yellow circles show the location of the raid kit components (memory, battery, raid key).

Fig 2
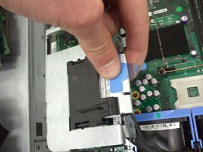
While you can get at the riser memory and the raid key without removing anything from the server, it will make your life a whole lot easier to take out or at least lift up the entire riser itself to get at the battery clip. Fig 2 shows the location of the release lever for the riser.
It is a blue lever towards the back of the server on the left side if you are facing the front of the server. Pull the lever back towards you. Be careful however, because sometimes it can bind while releasing and snap the pins inside causing you to have very bad day.

Once you have the lever lifted you can lift the riser straight up and off to the side to give you access to the clip that holds the battery wire to the riser card. Press in and lift to release the battery clip. Fig 3 shows the location of the battery clip and release tabs for the riser memory.

Fig 3
The hardest part of this removal is the battery from its carrier. There is a blue plastic tab (Fig 4) for you to pull up on while pressing back the black plastic that holds it in place.

Fig 4
Now that you have the entire raid kit removed, the installation of the new one is just the reverse of the removal.

For a more detailed and in-depth tutorial of this procedure, check out our How-to video at:  http://www.youtube.com/watch?v=kClQrK4-Crc. Don’t forget to check out our other videos at our YouTube channel: velocity783.

Have a How-To request?  Request your own and we will get right to work on it for you!

Tuesday, June 21, 2011

Setting up a Raid 5 with Perc 5/6 Raid Controllers

By Mike Kidd - Velocity Tech Solutions

For this edition of Tech Corner, I will be explaining how to set up a raid 5 on your Dell server with a Perc 5/6 raid controller. For the purpose of this demonstration, I will only be using 3 drives (the bare minimum required) for my raid 5 setup. Also, if your server is presently in production (live and in use) I don’t advise setting this up without consulting Dell to prevent data loss.

Figure 1


First thing we are going to do is start up our server, and when the screen displays Fig 1 press CTRL+R, and you will be presented with a menu that looks like Fig 2.

Figure 2


Once at this menu your screen will, assuming you do not already have a virtual disk setup, look like this. Now press F2 and a menu will pop up like the one in Fig 3.

Figure 3


Hit enter on “create new VD”, now you see a screen like Fig 4.

Figure 4


Hit “Enter” on “raid level” and a drop box will appear giving you available raid levels. Select “raid 5” and hit “enter”, press “Tab” and the cursor box will drop down to your available hard drives. Select these drives by pressing the “space bar”. Note you will see each drive ID appears on the right and a selected drive indicator on the left as an “X”. Now you can press “TAB” to move the cursor to your VD size and VD name, and advanced options.

For ease of use and my demonstration, just TAB over to the “OK” box on the far right of your screen and press “enter”. A message box will appear advising you to initialize your new Virtual Disk, which is exactly what we are going to do now. Once you press enter and the message box closes you will be back at the screen shown in Fig 2, except now you will actually see a virtual disk. Press F2 on your new VD and a menu will appear like that in Fig 5.

Figure 5


Select “Initialization” and press “enter”. Scroll down to “Fast Init.” And press “enter”. A Prompt will appear warning you that by initializing your new VD it will destroy any data on the drives. So as I said in the beginning, if your server is in production and is live and in use, PLEASE consult dell before continuing. Heeding my warning, Press enter and you will see a progress bar quick flash over your VD and say it is complete. A full initialize takes a very long time, so this at least allows you to install an OS or at least use the drives till the full initialize has completed. That’s it! You’re done!

For a more detailed and in-depth tutorial of this procedure, check out our How-to video at: http://www.youtube.com/watch?v=044qCZNiUJE. Don't forget to check out our other videos at our YouTube channel: velocity783.

Have a How-To request? Request your own and we will get right to work on it for you!

Monday, May 23, 2011

How to Change a 4 Bay Backplane to a 6 Bay Backplane on a Dell Poweredge 2950

By Mike Kidd

You know the old saying; if it isn’t broke don’t fix it? This is certainly true with the PowerEdge 2950 server. However, if you are one of those that has the 4 bay backplane installed you would probably enjoy more storage space. Fear not, there is a 6 bay backplane that is fairly easy to swap into your server and give you that expandability you want. So in light of that, I will be showing you a step by step on how to do this.

Things you will need.

Things you will need for the conversion:
  • 6 bay backplane
  • Flat-head screwdriver
  • Second cable for raid controller
All of the parts needed are available on our website www.velocitytechsolutions.com

First, shut down your server and remove your hard drives from the server, careful to note the order and placement of them for when you go to re-install them. You do not necessarily have to remove them completely from the server; you can just back them out to release them from the backplane.

Lightly pry the blue release lever
away from the riser card
Now, remove the cover from the server and proceed to remove your raid controller from the server. Sometimes they are stubborn and you need to take your flat-head screwdriver and lightly pry the blue release lever shown in the picture to the left, away from the riser card. Now, remove the black plastic shroud that is above the ram and processors and unhook the cable for the CD/DVD ROM drive.
Unhook the display cable from
the side riser by pressing the
metal tabs on each side.

Next, unhook the display cable from the side riser by pressing the metal tabs on each side, shown to the right. This connector can be stubborn as well and may require our trusty flat-head to lightly pry up one side to break it free.

Unhook the 2 power connectors..
At this point, remove the side riser by pressing in the 2 blue tabs and lifting upwards on the card. Go ahead and unhook the 2 power connectors for the backplane, shown in the picture to the left, as well as unhooking the power cord from the CD/DVD ROM drive. I personally like to slide the CD/DVD ROM drive forward a bit, but user preference.
Take out the 4 cooling fans by
lifting up on the orange
release bar.


Take out the 4 cooling fans by lifting up on the orange release bar.

Now, take out the black plastic piece that the fans were sitting on by pressing down on the blue lever, shown in the picture below, and by lifting up and out on the black plastic piece.

Take out the black plastic piece...
by pressing down on the blue lever.
Pull back on the blue release tab, shown in the picture on the right, and lift up on the backplane. While it is up, push towards the back of the server to clear the mount fins and the backplane now should be free to set off to the side.

Pull back on the blue release
tab and lift up on the backplane.
We can now do the reverse of the removal for installing the 6 bay backplane. Install it facing in the direction, show in the bottom left picture.

Install the 6 bay backplane facing in the
direction shown in this picture.
Line up the mount fins on the chassis to the backplane, and simply slide the unit down. It will lock in place. Install your riser card and plastic fan mount assembly next, then your raid controller, fans and power cables. Then, re-connect your CD/DVD ROM drive and place the plastic fan shroud in place and put the cover for the server back on.
Ensure controller 1 cable is
connected.


You are DONE! Now, you can re-install your drive and add another 2 hard drives for storage or whatever your heart desires.


For a more detailed and in-depth tutorial of this procedure, check out our How-to video at:  http://youtube.com/watch?v=T-oCuNbm-P0. Don't forget to check out our other videos at our YouTube channel: velocity783.

Have a How-To request?  Let us know and we will make a video for you!