Pin Type Processors, and You: A Quick Guide to Replacing or Removing the Older PIN Style Processors from PowerEdge Servers, 8th Gen and Older
By Mike Kidd – Velocity Tech SolutionsOne of the things I commonly find as a usual suspect in troubleshooting after replacing a system board is improperly seated or removed processors. Fret not, because this happens to the best of technicians and even the novice. In particular, when removing the processor from an 8th gen or older Dell server, the processor comes off with the heatsink. Not that this is always a problem, but it does greatly increase the chance of bending one of the thousands of tiny, tiny pins that make the unit work properly.
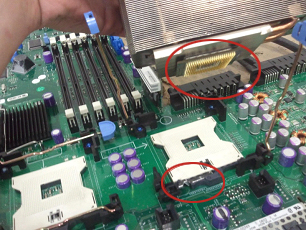
 Notice the silver lever on the white processor socket is still down and the CPU
itself is still attached to the heatsink. Some people assume that this
is normal practice and attempt to remove the CPU from the heatsink and
simply set it back on top of the processor socket without lifting that
silver bar.
Notice the silver lever on the white processor socket is still down and the CPU
itself is still attached to the heatsink. Some people assume that this
is normal practice and attempt to remove the CPU from the heatsink and
simply set it back on top of the processor socket without lifting that
silver bar.Here is what the bar does:
The bar moves the socket forward, and what happens when the bar is up, it lets the CPU pins enter the socket straight up and down. Once the bar is moved back down, the socket shifts and locks the pins in place, creating the solid connection needed to run.
So, you may be asking; how do I properly remove the heatsink and processor?
If you look at my fantastic MS Paint skills, you will grab onto the heatsink and give it a twist. This will break the thermal compound free that attaches the processor to the heatsink. At first, it may seem kind of stiff and as if it is going to break. Don’t worry. As long as you twist instead of lift, the processor will stay safely in its socket until you raise the metal lever.

Hopefully this article will help you correctly remove your CPU and assist in motherboard replacement.
Feel free to call us at 888-784-2088 or visit our website anytime at www.velocitytechsolutions.com